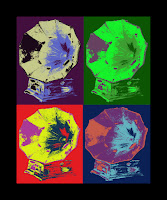

1. Press Ctrl+J to duplicate the background layer.
2. Click the Black and White button in the Adjustment Panel.
3. Click Auto to see if the contrast improves.
4. Move the color sliders to enhance the contrast.
5. Click the arrow to return to the Adjustment panel list.
6. Click the Posterize button in the Adjustment panel. The options in the Adjustment Panel changes.
7. Type a low number such as 4 in the levels data field.
8. Click the arrow to return to the Adjustment panel list.
9. Click the Gradient Map button in the Adjustment panel.
10. Click in the gradient.
11. Click two areas below the gradient bar to add two more color stops.
(Note: The number of color stops should match the levels of posterization that you entered in step 7.)
12. Click the leftmost color stop to select it.
13. Click the leftmost color stop to select it.
14. Click and drag the color slider.
15. Click in the color selector to select the darkest of the four colors you will use.
16. Click OK to close the Select stop color dialog box.
17. Repeat steps 12 to 16, selecting each of the other three color stops to change the color.
18. Click OK to close the Gradient Editor.
19. Click the Black and White adjustment layer.
20. Click and drag the color sliders to change the amount and areas of posterised colors.
21. Press Ctrl+S to save the file with all the layers so you can readjust it later

No comments:
Post a Comment