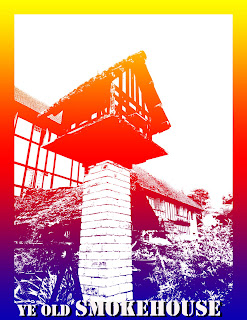

1. With an image open, click the Threshold button in the Adjustment panel.
2. Click and drag the slider to the right to make more tonal values shift to black or to the left to change more tones to white.
3. Click the New Adjustment Layer button.
4. Click Gradient.
Note: Clicking Solid Color produces a two-tone stylized effect with only one color and either white or black.
The Gradient Fill dialog box appears.
5. Click in the color bar to open the Gradient Editor.
6. Click a different preset.
7. Click OK to close the Gradient Editor dialog box.
The gradient is applied as a seperate adjustment layer covering the image.
8. Click the option box above the layers section and select Lighter Color to make the gradient cover only the black areas in the image, leaving the other areas white.
The gradient layer blends with the high contrast of the image.
Tip: Instead of Lighter Color, click the blend mode in the Layers panel and select Darker Color.
Tip: Create own custom gradient in the Gradient Editor by double clicking in each of the lower color stops under the gradient to open the color picker and select a new color.

No comments:
Post a Comment